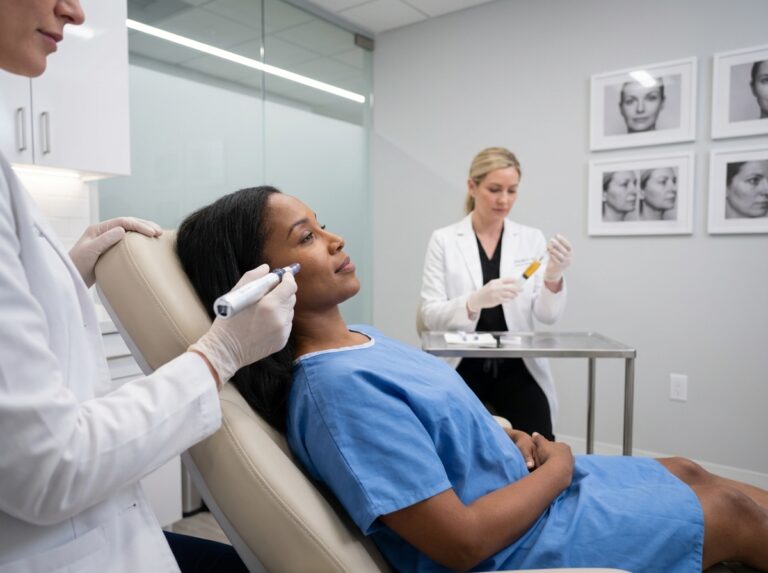
Microneedling is a popular noninvasive skin rejuvenation treatment that stimulates collagen through controlled micro-injury. This guide walks you through evidence-based aftercare for the first seven days to minimize complications, reduce downtime, and maximize results. It also places microneedling in context with laser facials, chemical peels, RF, and LED so you know what to expect and how to protect your skin.
Why Microneedling Works and Where It Fits
Microneedling relies on a biological mechanism that is both simple and sophisticated. The treatment uses sterile needles to create thousands of microscopic channels in the dermis. These are controlled injuries. They do not remove the skin layer like a laser or a chemical peel would. Instead, they trigger a natural wound-healing cascade.
Your body perceives these micro-channels as damage that needs immediate repair. This kickstarts the release of growth factors and stimulates the production of new collagen and elastin. We call this process collagen induction therapy. The structural integrity of the skin improves as these proteins rebuild the dermal matrix. The result is thicker and more resilient skin with a smoother texture.
There is a secondary benefit to these channels. They act as temporary tunnels for topical products. The skin barrier is designed to keep things out. This makes it difficult for serums to penetrate deep enough to be effective. Microneedling bypasses this barrier for a short window of time. It allows active ingredients like peptides or growth factors to reach the depth where they can actually influence cellular function.
Comparing Microneedling to Other Modalities
Understanding where microneedling fits in the hierarchy of skin rejuvenation helps manage expectations. It sits in a unique position between superficial facials and aggressive resurfacing lasers.
Fractional Lasers vs. Microneedling
Lasers use light energy to create heat. This heat vaporizes columns of tissue. It is highly effective for surface pigmentation and deep resurfacing. However, the heat carries a risk of burns and post-inflammatory hyperpigmentation. This is especially true for darker skin tones. Microneedling is mechanical rather than thermal. It does not generate heat. This makes it a safer alternative for those prone to pigment issues or those with Fitzpatrick skin types IV through VI. The downtime is generally shorter with microneedling because there is no thermal damage to heal.
Chemical Peels vs. Microneedling
Chemical peels work by exfoliating the top layers of the skin using acids. They are excellent for surface brightness and mild texture issues. Microneedling works from the inside out. It remodels the structure of the skin rather than just stripping the surface. You might choose a peel for an immediate glow before an event. You would choose microneedling for long-term structural changes like reducing acne scars or firming lax skin.
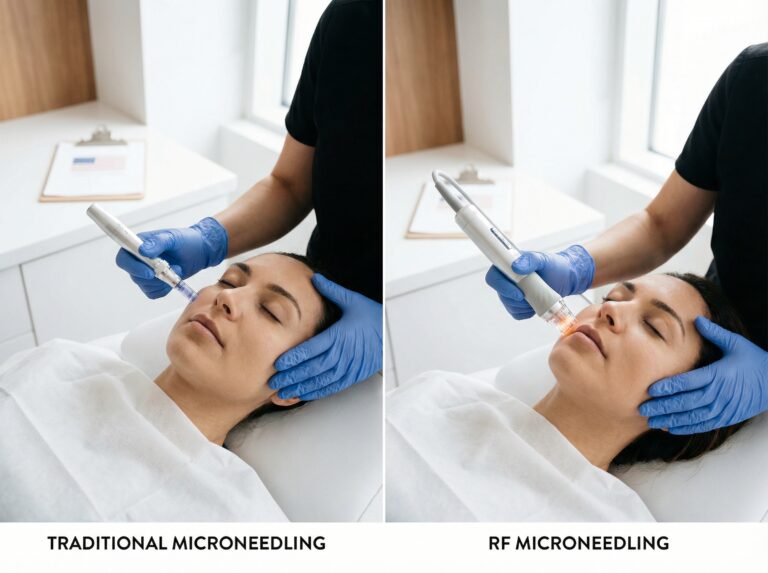
Radiofrequency (RF) Microneedling
This is the advanced version of the standard treatment. The needles deliver radiofrequency energy directly into the dermis. The heat tightens existing collagen fibers and stimulates more production than needles alone. It is significantly more effective for skin laxity and deep wrinkles. The recovery is slightly more intense due to the thermal component but often faster than lasers.
LED Therapy
Light Emitting Diode therapy is non-invasive and uses specific wavelengths of light to reduce inflammation or kill bacteria. It does not cause structural injury. It is often used after microneedling to speed up recovery and reduce redness. It is a complementary treatment rather than a standalone alternative for scarring or deep wrinkles.
| Treatment | Primary Mechanism | Best For | Typical Downtime |
|---|---|---|---|
| Standard Microneedling | Mechanical micro-injury | Acne scars, texture, pores | 24 to 72 hours redness |
| RF Microneedling | Mechanical + Thermal | Sagging, deep wrinkles | 1 to 3 days swelling/redness |
| Fractional Laser | Thermal ablation | Severe sun damage, deep scars | 5 to 10 days |
| Chemical Peels | Chemical exfoliation | Surface pigment, dullness | 3 to 7 days peeling |
Indications and Skin Type Considerations
Microneedling is versatile. It addresses a wide range of concerns because collagen remodeling is the universal solution for many skin flaws.
Acne Scars and Texture
This is the most common indication. The needles break up fibrous scar tissue and tethered scars. The new collagen fills in depressions. It works best on rolling and boxcar scars. Ice pick scars may require stronger interventions like TCA cross.
Fine Lines and Wrinkles
The loss of collagen causes skin to fold. Rebuilding that support structure softens lines. It is particularly effective for perioral lines (around the mouth) and crow’s feet where skin is thin.
Enlarged Pores
Pores appear larger when the skin around them loses elasticity. By firming the surrounding tissue microneedling tightens the appearance of the pore. It does not physically shrink the pore size but makes them look significantly smaller.
Stretch Marks
These are essentially scars from rapid stretching. Microneedling can improve the texture and color of stretch marks on the body. It requires deeper needle penetration than facial treatments.
Pigmentation and Melasma
This requires caution. Microneedling can break up pigment clusters. It also increases the absorption of pigment-inhibiting serums. However, aggressive treatment can trigger inflammation. Inflammation can worsen melasma. A gentle approach with appropriate topicals is necessary.
Safety for Darker Skin Tones
Patients with Fitzpatrick skin types IV, V, and VI often struggle to find safe rejuvenation options. Lasers target melanin and can cause hypopigmentation (white spots) or hyperpigmentation (dark spots). Microneedling is “color-blind.” It does not target chromophores. It is mechanically driven. This makes it one of the safest options for melanin-rich skin when performed correctly. The risk of PIH exists but is significantly lower than with heat-based devices.
Professional vs. At-Home Devices
There is a distinct difference between the medical-grade devices used in a clinic and the rollers sold for home use.
Needle Depth and Precision
Professional devices are automated pens. They use sterile disposable cartridges. The provider adjusts the depth from 0.25mm up to 2.5mm or more depending on the area. Forehead skin is thin and needs shallow depth. Cheek scars are deep and need more penetration. The vertical stamping motion prevents tearing.
At-home rollers usually have a fixed depth of 0.2mm to 0.5mm. This depth is sufficient to increase product absorption but it is rarely deep enough to stimulate significant collagen remodeling. The rolling motion can create a “cat scratch” effect if the needles enter and exit the skin at an angle. This causes unnecessary trauma without the benefit of controlled vertical injury.
Safety and Sterility
Infection control is critical. Professional environments are sterile. At-home devices are difficult to sterilize completely. Using a roller on active acne spreads bacteria and causes breakouts. Bent needles on a home roller can damage the skin surface and lead to scarring.
Why Aftercare Dictates Results
The success of microneedling depends entirely on how the skin heals. The procedure itself is only the stimulus. The magic happens during recovery.
Preventing Infection
The microchannels remain open for a short period, usually about 18 to 24 hours. During this time the skin is vulnerable to bacteria. Touching the face, using old makeup brushes, or sweating in a gym can introduce pathogens. This leads to granulomas or bacterial infections that can scar.
Controlling Inflammation
Some inflammation is necessary to trigger the healing cascade. Too much inflammation causes damage. This is why we avoid anti-inflammatory medications (NSAIDs) immediately after treatment but use soothing topicals. Prolonged inflammation increases the risk of Post-Inflammatory Hyperpigmentation (PIH). This is a brown discoloration that appears after the redness fades. It is the skin’s reaction to trauma. Proper hydration and sun avoidance minimize this risk.
The Role of Topicals
The absorption rate of products skyrockets during the procedure and shortly after. Applying the wrong product can cause granulomas or severe allergic dermatitis. Ingredients must be formulated for open skin. They should be free of preservatives, fragrances, and cytotoxic agents. Hyaluronic acid and peptides are standard. Growth factors and Platelet-Rich Plasma (PRP) are often applied to accelerate healing and boost collagen synthesis.
Realistic Timelines for Improvement
Patience is required with collagen induction therapy. You will not see the final result the day after the redness fades.
Immediate to 1 Week
You will see a “plumping” effect immediately. This is largely due to mild swelling and increased blood flow. The skin may look radiant after the initial peeling phase subsides around day 7. Full recovery of the skin barrier typically takes 7 to 10 days.
4 to 6 Weeks
This is when the real changes begin. The body takes about 4 to 6 weeks to synthesize new collagen. You will start to see improvements in fine lines and pore size. The skin feels firmer.
3 to 6 Months
Collagen maturation continues for months. The results are cumulative. Most providers recommend a series of 3 to 6 treatments spaced 4 to 6 weeks apart. The full benefit of that series is often visible three months after the final session. Treating deep acne scars may require a longer timeline and more sessions.
Your 7 Day Aftercare Plan
The success of your microneedling treatment depends heavily on how you treat your skin during the first week. The micro-injuries created during the session are open channels. They need specific conditions to heal correctly and produce the collagen you want. This guide breaks down exactly what to do and what to avoid for the next seven days.
Day 0. The Treatment Day
Your skin just underwent a controlled trauma. It will feel hot, tight, and sensitive. It often looks like a moderate to severe sunburn. The primary goal right now is protection and calming inflammation.
Cleansing and Water Contact
Do not wash your face for at least 4 hours after the appointment. Ideally, you should wait until the next morning. If you must cleanse due to discomfort or sweat, use only lukewarm water. Do not use any cleanser yet. The microchannels remain open for several hours. Tap water can introduce bacteria. Use distilled water if possible or simply leave the skin alone.
Topical Products
Your provider likely applied a hyaluronic acid serum or a post-procedure balm (or PRP). Leave this on. Do not apply makeup. Do not apply sunscreen. Do not apply your regular moisturizer. The only allowed product is a sterile hyaluronic acid serum if your skin feels unbearably tight. Avoid anything with fragrance or active ingredients.
Managing Discomfort
You might feel a pulsing heat. This is normal. You can take Tylenol (acetaminophen) for pain. Avoid NSAIDs like Ibuprofen or Advil for the first 48 hours. These anti-inflammatory drugs can inhibit the natural inflammatory response which is necessary for the collagen production process you just paid for.
Sleep Position
Sleep on your back with your head slightly elevated on an extra pillow. This helps reduce swelling. Avoid sleeping on your face. Change your pillowcase to a fresh one to minimize bacterial risk.
Day 1. The Day After
You will likely wake up with redness and perhaps some minor swelling. The skin may feel like sandpaper. This is the beginning of the healing process.
Cleansing
You can now wash your face. Use a gentle, non-exfoliating cleanser. Use lukewarm water and your clean hands. Do not use a washcloth, sponge, or sonic cleansing brush. Do not stand directly under the shower head; the pressure can irritate the sensitized skin. Pat the skin dry with a clean paper towel rather than a reusable towel.
Skincare Routine
Focus solely on hydration and soothing. Apply a pure hyaluronic acid serum. You can use a gentle, fragrance-free moisturizer recommended by your specialist. Look for ingredients like ceramides or peptides that support the skin barrier.
Makeup and Sunscreen
Avoid makeup if possible. If coverage is absolutely necessary, you may use a mineral-based powder after 24 hours, as the microchannels should be closed. Do not use liquid foundation or BB creams yet, as they can clog pores.
Regarding sun protection: Your skin is extremely vulnerable. Avoid direct sun exposure completely. If you must go outside, wear a wide-brimmed hat. You may begin using a mineral-based sunscreen (Zinc Oxide or Titanium Dioxide) 24 hours post-treatment. Avoid chemical sunscreens for now as they may sting.
What to Avoid
- No Vitamin C serums.
- No Retinoids (Retin-A, retinol, retinaldehyde).
- No Alpha Hydroxy Acids (Glycolic, Lactic).
- No Beta Hydroxy Acids (Salicylic).
Days 2 and 3. The Peeling Phase
Redness usually starts to fade, but dryness sets in. You might notice flaking or peeling. This is dead skin cells turning over. It is a good sign.
Handling Peeling and Scabs
Do not pick at your skin. Do not scrub the flakes off. Pulling at peeling skin can rip live tissue and lead to scarring or hyperpigmentation. Let the skin shed naturally. If you see tiny scabs, leave them alone. They protect the healing tissue underneath.
Hydration is Critical
Your skin will feel thirsty. Apply your hyaluronic acid and gentle moisturizer multiple times a day if needed. Keeping the skin hydrated reduces the urge to itch. You can use a thermal water spray to soothe the skin throughout the day.
Activity Restrictions
Avoid sweating. Sweat contains bacteria and salt which can irritate the healing skin. Skip the gym, sauna, and hot tub. Swimming in pools or oceans is strictly off-limits due to chlorine and bacteria.
Days 4 and 5. Turning the Corner
The majority of the visible healing happens here. The peeling should slow down. The skin starts to feel less sensitive.
Makeup and Sunscreen
You must be wearing sunscreen daily by now. Continue with mineral-based options. You can now resume wearing light makeup, though mineral formulas are still preferred over heavy liquids to allow the skin to breathe. Ensure all makeup brushes are freshly cleaned before application.
Skincare Adjustments
Continue with the gentle cleanser and hydrating serums. Do not restart active acids or retinoids yet. The new skin is still too delicate.
Days 6 and 7. Back to Normal
By the end of the week, your skin should look normal or slightly better than before. The barrier is mostly restored.
Resuming Actives
You can slowly reintroduce your active skincare products. Start with Vitamin C in the morning. If you use retinoids, wait until the full 7 days are up and start with a lower frequency. If your skin feels sensitive upon application, wash it off and wait another two days.
Exfoliation
Do not use physical scrubs yet. If you have remaining flakes, use a very mild enzyme cleaner or simply massage gently with oil. Avoid harsh chemical peels or laser treatments for at least another two weeks.
Summary of Allowed and Prohibited Activities
| Activity | Wait Time |
| Washing Face | 24 hours (lukewarm water only first) |
| Mineral Makeup / SPF | 24 to 48 hours |
| Liquid Makeup | 4 to 5 days |
| Sweating / Gym | 72 hours |
| Direct Sun | 14 days (wear hat/SPF) |
| Retinoids / Acids | 7 days |
| Swimming | 5 to 7 days |
Special Considerations
Different skin types and treatment variations require slight adjustments to the standard protocol.
RF Microneedling and PRP
If you had Radiofrequency (RF) Microneedling, the heat component adds another layer to recovery. You might experience more dryness and tiny grid marks on the skin. The downtime is often similar, but the dryness can be more intense. Focus heavily on hydration. If you had PRP (Platelet-Rich Plasma), your provider likely left the plasma on your face. Leave this on for as long as instructed, usually until the next morning. It accelerates healing. Do not wash it off prematurely.
Darker Skin Tones (Fitzpatrick IV-VI)
Melanin-rich skin is more prone to Post-Inflammatory Hyperpigmentation (PIH). The “no sun” rule is stricter for you. Even minor UV exposure during the healing phase can trigger dark spots. Be extremely gentle when washing your face to avoid friction. Your provider might recommend a tyrosinase inhibitor for a few weeks before and after the treatment to calm down pigment-producing cells. If you notice darkening, contact your provider immediately.
Acne-Prone Skin
You might experience a “purge” or a few whiteheads after treatment. This is common. Do not pop them. This spreads bacteria into the healing microchannels. Keep the skin clean and let them resolve on their own. If you are on acne medication, ensure your provider knows before the treatment, as some medications affect healing rates.
Home Microneedling Users
Home devices usually have shorter needles (0.2mm to 0.5mm). The recovery is faster, typically 24 to 48 hours. You still need to avoid makeup for a day and keep the device sterile. You can usually resume normal activities sooner, but the hygiene rules regarding touching your face remain the same.
Troubleshooting and Red Flags
Knowing the difference between a normal reaction and a complication is vital for safety.
Normal Reactions
- Redness similar to a sunburn for up to 3 days.
- Tightness and itching.
- Minor flaking or peeling.
- Pinpoint bleeding immediately after the procedure (stops quickly).
Warning Signs (Contact Provider)
- Excessive Heat: If the skin feels hot to the touch 48 hours later.
- Pus or Discharge: Yellow or green fluid oozing from the skin indicates infection.
- Blisters: This could be a reaction to a topical product or a sign of herpes simplex outbreak if you are prone to cold sores.
- Fever: A systemic fever is a sign of a serious infection.
- Darkening: Patches of brown or grey pigment appearing rapidly.
If you suspect an infection, do not try to treat it with home remedies. Call your clinic. They may prescribe a topical antibiotic. Early intervention prevents scarring.
Treatment Protocols and Expectations
Beyond the daily care routine, understanding the broader treatment strategy helps ensure you get the most out of your sessions. Here are the answers to common questions regarding the treatment lifecycle.
How long will the redness and sunburn feeling last?
The duration of redness depends heavily on the needle depth used and your individual skin sensitivity. For a standard cosmetic treatment (0.5mm to 1.0mm), you will look like you have a moderate sunburn. This usually feels tight and warm. Deeper medical-grade treatments (1.5mm to 2.5mm) or RF microneedling will produce more intense redness and potentially some pinpoint bleeding or bruising. This is a normal inflammatory response and signals that the repair process has started. Peak redness occurs in the first 24 hours. It typically fades to pink by day 3 and resolves by day 5.
Can I combine microneedling with PRP or LED therapy?
Combining treatments is often recommended to enhance results and speed up recovery. PRP (Platelet-Rich Plasma) involves using your own blood plasma to boost healing factors. It is applied during the procedure. LED light therapy is also excellent. Red light reduces inflammation and stimulates collagen, making it a perfect add-on immediately after the session. However, chemical peels are too aggressive to combine in the same session and should be spaced 2 to 4 weeks apart.
How many sessions are typical and how are they spaced?
Collagen induction is cumulative. One session is rarely enough to address significant concerns like acne scarring or deep wrinkles. Most clinical protocols recommend a series of 3 to 6 treatments spaced 4 to 6 weeks apart. The spacing is important because you need to allow the full cycle of inflammation and repair to complete before traumatizing the skin again. Treating too frequently (e.g., every 2 weeks) can lead to chronic inflammation and scarring.
What are the pain, anesthesia, and downtime expectations?
Pain tolerance varies, but most people find the treatment manageable with topical anesthesia. You will feel a vibration and a scratching sensation. Bony areas like the forehead and jawline tend to be more sensitive than the cheeks. Downtime is usually “social downtime,” meaning you might not want to go to a dinner party, but you are physically fine to work or do light activities. Numbing cream is typically applied 30 to 45 minutes prior to the session.
Final Considerations for Safe Treatment
The success of your recovery often starts before the first needle touches your skin. Choosing the right provider is just as critical as the aftercare.
Always confirm the qualifications of the person performing the treatment. In many states, this must be a licensed aesthetician, nurse, or doctor. Ask about the device they use. FDA-cleared devices offer a higher safety profile than generic pens purchased online. The depth and speed of the needles matter. A professional device prevents tearing the skin which reduces recovery time.
Be honest about your medical history. If you are prone to cold sores, the mechanical trauma can trigger an outbreak. Your provider can prescribe an antiviral medication to take beforehand. This simple step saves you from a painful and scarring complication.
Recovery is a short period of inconvenience for a long-term gain. Treat your skin with respect during this week. Follow the protocols for hygiene and hydration. Stay patient. The fresh and smoother skin revealing itself underneath is worth the wait.
References
- Your Essential Guide to Microneedling Aftercare: Day-By-Day — Full recovery: 7-10 days for complete skin barrier restoration; Optimal results: 4-6 weeks as new collagen forms.
- Understanding the Microneedling Recovery Timeline — Day-by-Day Microneedling Healing Stages.
- Microneedling Aftercare: A Day-by-Day Recovery Timeline – MDPen — Days 5-7: Revealing Smoother Skin.
- The Complete RF Microneedling Recovery Guide — Full healing generally occurs within 5 to 7 days.
- What to Expect After Microneedling: Day-by-Day Recovery Guide — Most clients experience redness and mild swelling for 24-48 hours.
- Guide to Microneedling Aftercare – Image Surgical Arts — Day-by-day tips and recommended products.
- Microneedling Aftercare: What to Do (and Avoid) for Best Results — Days 1–2: Redness, warmth, tightness.
- Microneedling Aftercare: Day-by-Day Timeline & Recovery Tips — Quick reference point for microneedling aftercare.
- Skin Care Tips For Microneedling Aftercare – ALASTIN Skincare — Microneedling post care tips to maintain your gorgeous glow!
Legal Disclaimers & Brand Notices
The information provided in this article is for informational and educational purposes only and does not constitute professional medical advice, diagnosis, or treatment. Always seek the advice of a physician or other qualified health provider with any questions you may have regarding a medical condition or specific aesthetic procedure. Never disregard professional medical advice or delay in seeking it because of something you have read in this content.
All product names, logos, and brands mentioned in this text are the property of their respective owners. All company, product, and service names used in this article are for identification purposes only. Use of these names, logos, and brands does not imply endorsement or affiliation.