After non‑invasive skin rejuvenation, many patients worry when acne appears or worsens. Some flares reflect a true purge driven by accelerated cell turnover, while others indicate irritation, infection, or pigment issues. This article explains the physiology of purging, which treatments cause it, expected timelines, and practical aftercare so you can distinguish a normal breakout from a complication requiring medical intervention.
What the Purge Phase Means and How It Differs from Other Reactions
Clinicians and patients often use the term “purge” to describe the frustrating paradox where skin looks worse before it gets better. You book a treatment to clear your complexion but end up with a sudden crop of pimples a week later. This phenomenon is not a random breakout; it is a calculated physiological response to accelerated cell turnover.
A true purge occurs when a treatment speeds up the skin’s natural exfoliation cycle. The average adult skin cycle takes about 28 days. Treatments like chemical peels or microneedling accelerate this process significantly. Microcomedones—tiny clogged pores lurking beneath the surface that are not yet visible—are forced to rise to the surface rapidly. You see them appear as whiteheads, blackheads, or small papules. They were already present; the treatment simply evicted them all at once.
The Physiology Behind the Breakout
Understanding the biological mechanism helps reduce anxiety. The skin constantly sheds dead cells and produces oil. When this process slows down, dead keratin and sebum get trapped, forming a plug.
Accelerated Turnover
Active treatments stimulate the basal layer of the epidermis. New cells push upward faster than usual. This rapid transit carries deep-seated debris to the surface, creating a temporary traffic jam at the pore opening.
Inflammatory Response
The immune system recognizes this sudden movement of bacteria and debris, launching a mild inflammatory response. This results in the redness and slight swelling often seen with purging. It differs significantly from the deep, throbbing inflammation of cystic acne.
Distinguishing Purging from Adverse Reactions
You must distinguish between a productive purge (clearing) and a harmful reaction (rejecting/injury). Misidentifying these can lead to scarring or infection.
Location Matters
Purging occurs in areas where you are already prone to breakouts. If you usually get acne on your chin, a purge will likely happen there. A reaction often happens in new areas. If you suddenly break out on your neck or cheeks where you are usually clear, that is likely irritation or contact dermatitis.
Duration and Type
Purge pimples are short-lived. They appear quickly and resolve within days to a week. They are typically small whiteheads or blackheads. Reactions often manifest as red, itchy rashes or deep, painful nodules that last for weeks.
| Feature | True Purge | Adverse Reaction |
|---|---|---|
| Onset | 2 to 7 days post-treatment | Immediate (24-48 hours) |
| Duration | 4 to 6 weeks (total phase) | Persists until trigger stops |
| Sensation | Mild tenderness | Itching, burning, stinging |
| Appearance | Small papules, comedones | Hives, blisters, cysts, rash |
Mechanisms by Treatment Type
Different procedures trigger purging through unique pathways.
Chemical Exfoliation
Peels and retinoids work by dissolving the bonds between dead skin cells, causing rapid desquamation. The sudden release of dead skin can temporarily block pores before clearing them. This is the most common cause of purging.
Mechanical Extrusion
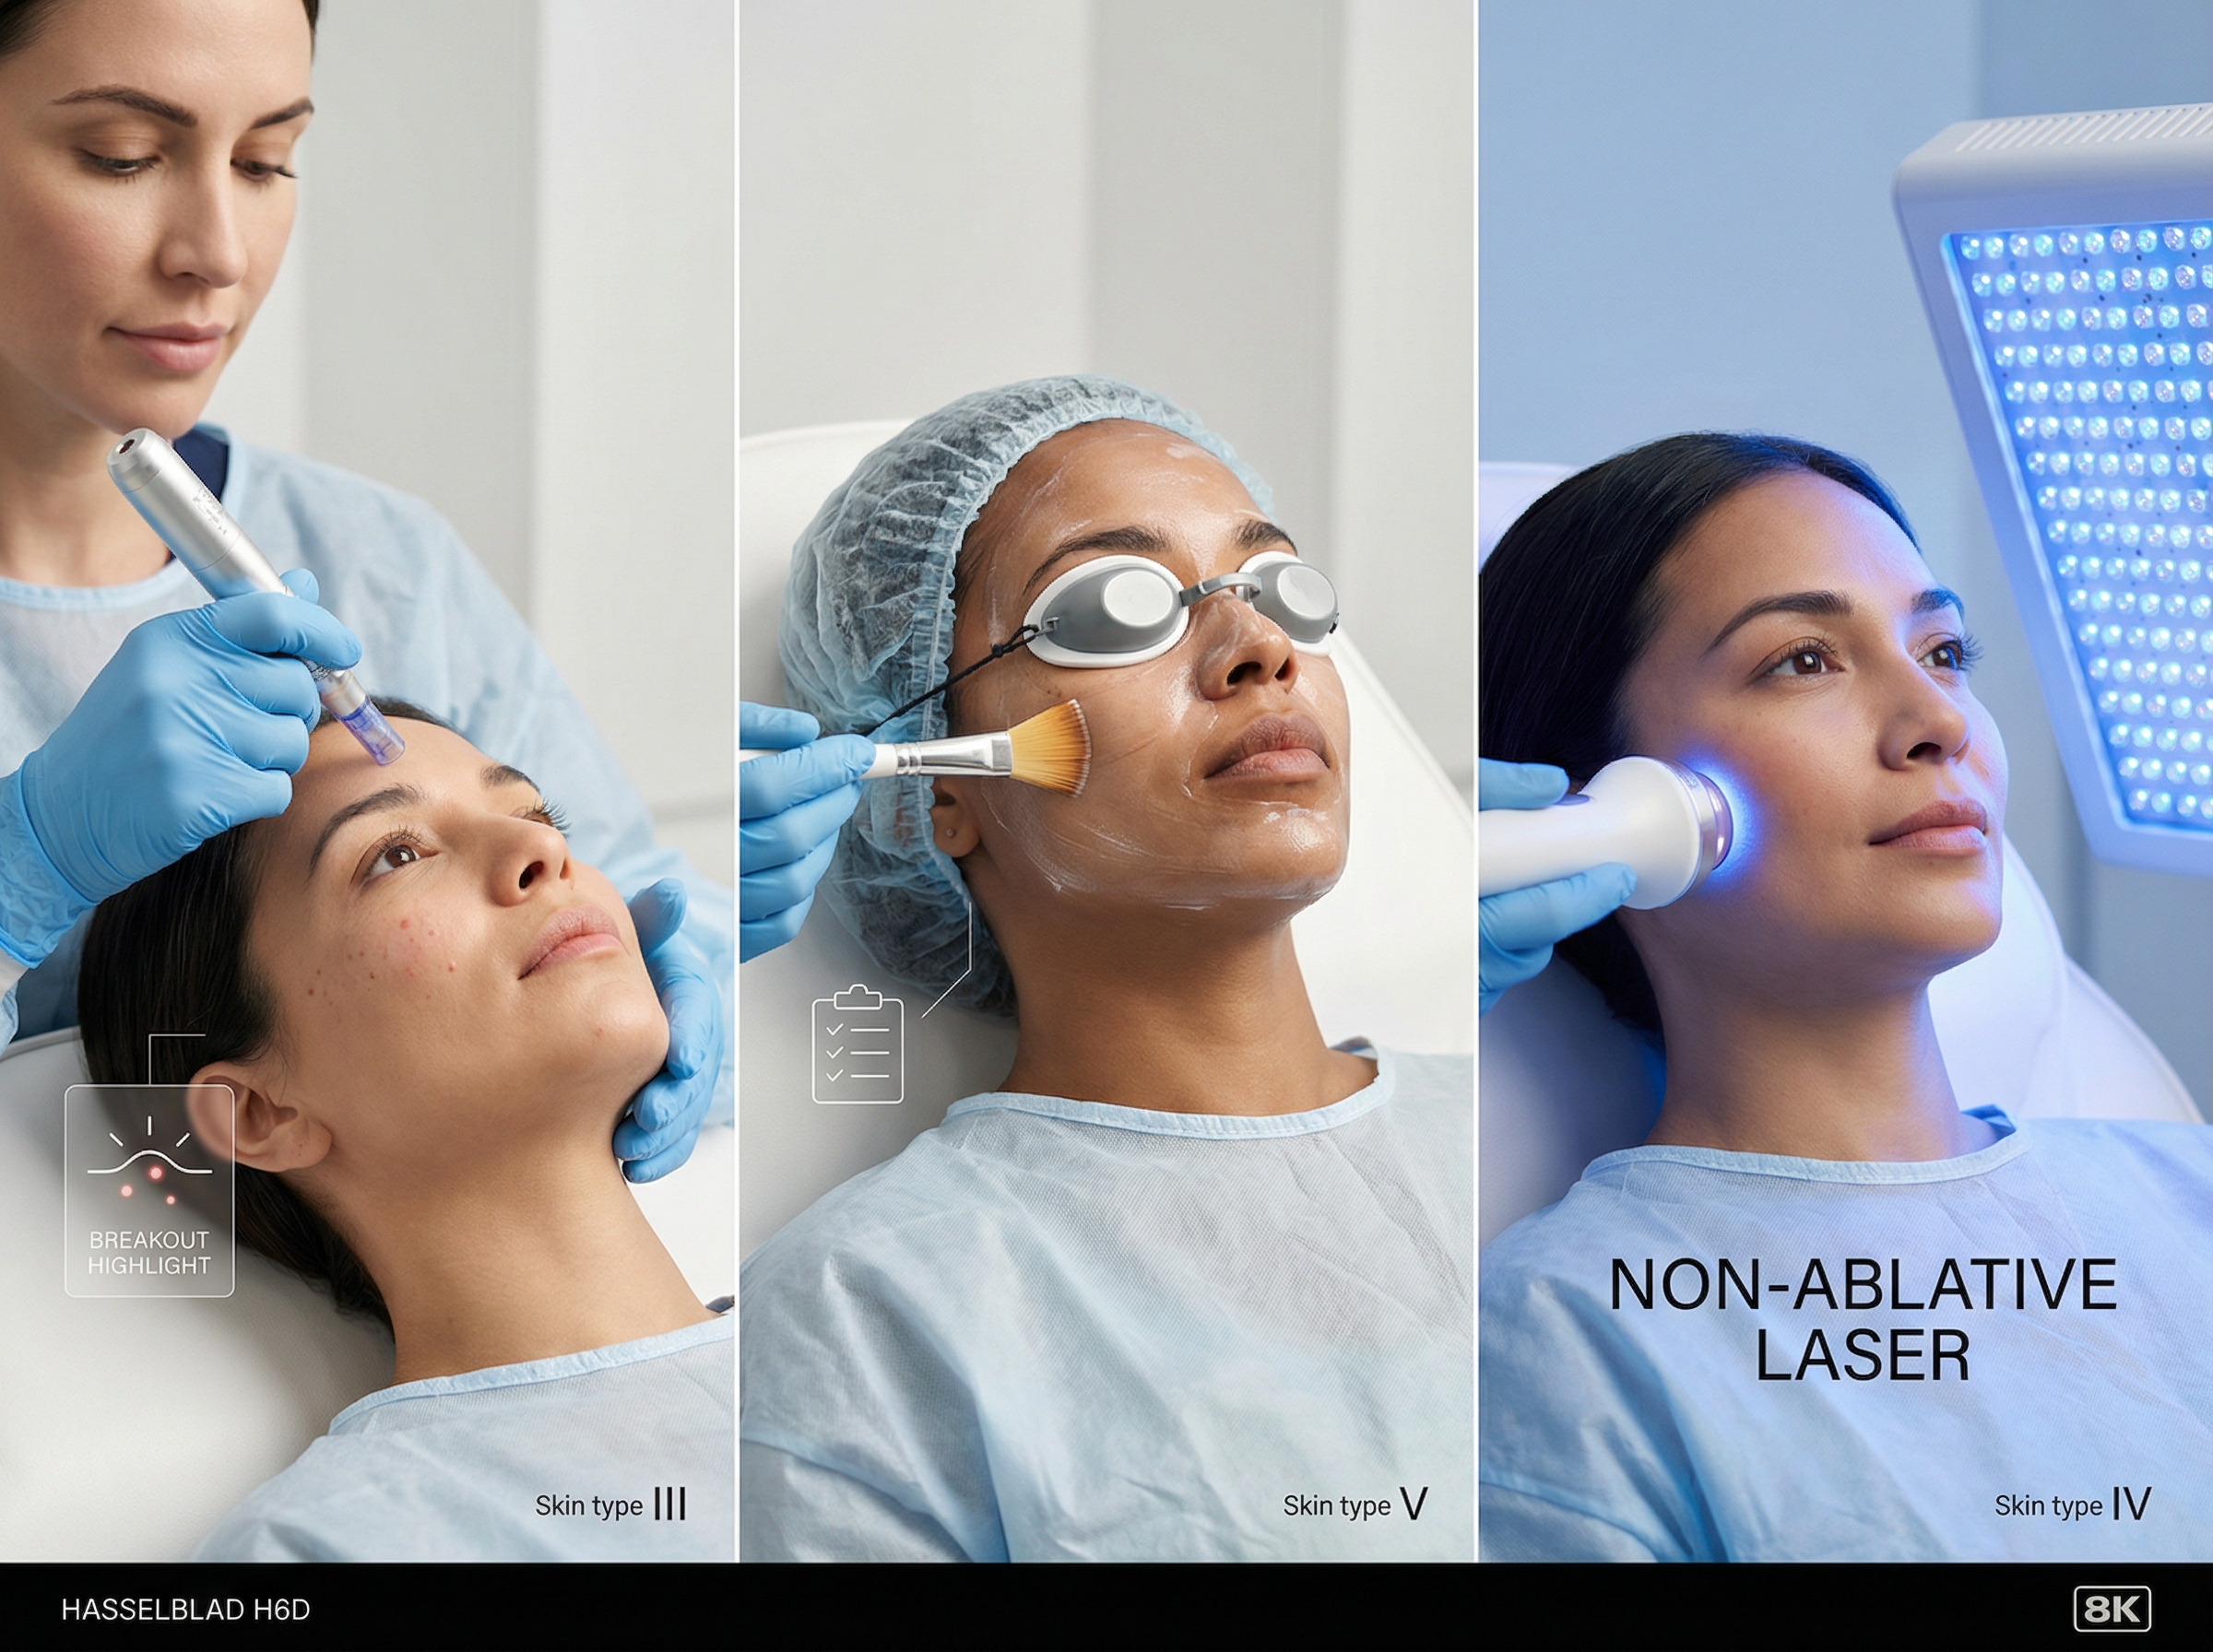
Microneedling creates thousands of physical channels in the skin. This physical trauma can mechanically push underlying debris toward the surface. The inflammation from the needles also stimulates turnover. This type of purge often looks like tiny white pustules appearing 2 to 3 days after the session.
Thermal and Ablative Response
Lasers deliver heat. Ablative lasers vaporize tissue. This intense thermal shock triggers a massive wound-healing response. The skin ramps up production of everything, including oil and cells, potentially unmasking dormant lesions.
The Typical Timeline
Patience is the primary requirement during this phase. The timeline follows a bell curve.
Weeks 1 to 2
The onset phase. You might notice skin texture becoming rougher. Small bumps begin to surface. This is normal.
Weeks 3 to 4
The peak. The breakout may look its worst here. However, the lesions should be healing faster than a standard pimple.
Weeks 5 to 6
The resolution. New, healthy skin cells replace the congested ones. The texture smooths out. If breakouts persist beyond this window with no sign of improvement, re-evaluate the treatment plan.
Safety for Darker Skin Tones
Patients with Fitzpatrick skin types IV through VI face higher stakes. Inflammation in darker skin often leads to Post-Inflammatory Hyperpigmentation (PIH). A purge that leaves behind dark spots for months is not a successful outcome.
Gentle Protocols
Aggressive purging is risky for melanin-rich skin. Clinicians often prefer slower, progressive treatments over one aggressive session to keep inflammation manageable.
PIH Management
If a purge occurs in darker skin, sun protection is non-negotiable. Any UV exposure on inflamed acne will darken the pigment. Using tyrosinase inhibitors (like kojic acid or tranexamic acid) during the treatment course can help prevent these dark spots.
Clinical Triage and Management
Knowing when to stay the course and when to intervene is vital.
Conservative Management
For a standard purge, less is more. Stick to a gentle cleanser and a simple moisturizer. Avoid adding new active ingredients like benzoyl peroxide or strong acids, as these can damage the compromised moisture barrier. Do not pick or squeeze the lesions; this spreads bacteria and increases scarring risk.
When to Modify Regimens
If the skin feels tight, red, or stings upon application of products, the barrier is impaired. Stop all retinoids and exfoliants. Focus solely on hydration and barrier repair until the sensation subsides.
Red Flags for Escalation
Certain signs indicate a medical complication rather than a purge.
- Infection Signs
Increasing pain, warmth radiating from the area, or yellow/green drainage are not normal. If lesions are “weeping” or have honey-colored crusting, this requires immediate medical attention and possibly antibiotics. - Herpetic Outbreak
Clusters of painful, fluid-filled blisters are likely a reactivation of the herpes simplex virus (cold sores). This can spread rapidly after skin trauma and requires immediate antiviral medication. - Allergic Contact Dermatitis
Intense itching and a spreading red rash suggest an allergy to a topical product used during or after the treatment.
Skin purging typically lasts 4-6 weeks and should be viewed as a temporary hurdle. It is the skin’s way of clearing out the old to make room for the new.
How Specific Treatments Behave: Microneedling, Chemical Peels, Laser, RF, and LED
Not every treatment triggers a breakout for the same reason. The mechanics matter. Understanding these differences helps you predict whether that new cluster of pimples is a sign of success or a cry for help.
Microneedling
This procedure creates thousands of microscopic puncture wounds, acting as a physical wake-up call for your collagen.
The Mechanism
Microneedling physically disrupts the epidermis and can rupture the follicular wall of clogged pores. It pushes deep congestion to the surface rapidly—a process called mechanical extrusion. You might see whiteheads appear where you previously only felt a bump under the skin.
Purge vs. Inflammatory Flare
True purging here looks like small whiteheads that resolve quickly. An inflammatory flare looks different: red, swollen, and painful bumps that do not come to a head. This often happens if the technician drags the pen rather than stamping it, or if you sweat heavily right after the session.
Infection Risk
Sterility is paramount. If the device was not sterile or the skin was not properly degreased, bacteria can be introduced deep into the dermis. This causes a breakout that spreads and feels hot, requiring immediate medical attention.
Pre and Post Care
Stop using retinoids 3 to 7 days before your appointment. Do not treat active acne with microneedling because it spreads bacteria. After the treatment, use only a gentle cleanser and hyaluronic acid for the first 24 hours. Avoid makeup and sweating. Resume your retinoids only after your skin feels completely healed, usually after 5 to 7 days.
Chemical Peels
Peels are the most common culprit for purging. They work by dissolving the bonds between dead skin cells.
Depth Matters
Superficial peels use AHA, BHA, or low-strength TCA (20–30%). These target the top layer and frequently cause purging in acne-prone patients. Medium peels (35% TCA) and deep peels (phenol) go further, causing sheets of skin to peel off. Deep peels are less likely to cause a standard “purge” of pimples but cause massive exfoliation and swelling.
Exfoliative Purging
Acids like salicylic acid penetrate oil glands, forcing the skin cycle to speed up. A cycle that usually takes 28 days might happen in half the time, bringing everything to the surface at once. Skin purging typically lasts 4-6 weeks when induced by these chemical accelerators.
Patient Selection
Patients with comedonal acne (blackheads and whiteheads) benefit most from superficial peels. The purge clears the blockage. Patients with inflamed, cystic acne need careful evaluation, as a strong peel can aggravate inflammation before it helps.
Laser Facials
Lasers use light energy to target water or pigment in the skin. The reaction depends heavily on whether the laser breaks the skin barrier.
Non-Ablative Lasers
Treatments like Nd:YAG or fractional non-ablative lasers heat the tissue without destroying the surface. They rarely cause a true purge. You might see transient erythema (redness) or mild swelling. If you break out after this, it is often a heat rash or a reaction to the ultrasound gel or post-procedure creams.
Ablative Resurfacing
CO2 and Erbium lasers vaporize skin layers. This major injury does not cause a “purge” in the traditional sense but can unmask underlying lesions. The risk of complications is higher here; bacterial, viral, or fungal infections can occur on the raw skin, appearing as pustules that require medication.
Radiofrequency (RF)
RF devices send energy deep into the skin to tighten tissue.
No True Purge
RF does not accelerate cell turnover like a peel or retinoid. It generally does not cause purging. If you see bumps, they are likely not acne.
Side Effects
The heat can provoke temporary papules or erythema. In some cases, the occlusion of sweat ducts during the procedure causes folliculitis—small, itchy bumps that look like acne but are actually inflamed hair follicles. They usually resolve in a few days with cool compresses.
LED Phototherapy
Light Emitting Diode therapy is the gentle giant of skin treatments.
Why It Does Not Purge
LED light does not damage the skin or speed up exfoliation aggressively. Blue light kills acne bacteria, and red light reduces inflammation. It is often used to stop a purge or calm the skin after other treatments.
Universal Guidelines for Patients
Regardless of the device or acid used, certain rules apply to keep you safe.
Patient Screening
You must disclose everything. Active acne matters. A history of isotretinoin (Accutane) use in the last 6 months can compromise healing. Pregnancy alters your hormonal balance and pigment risks.
Immediate Aftercare
Throw away your complex routine for a few days. Use a bland, non-foaming cleanser and a moisturizer focusing on barrier repair (look for ceramides). Sun protection is non-negotiable; physical blockers with zinc oxide are less irritating than chemical sunscreens on traumatized skin.
Resuming Actives
Do not rush back to your acids and retinoids. Wait until the skin barrier is restored. For superficial treatments, this might be 3 to 5 days; for deeper lasers, 2 weeks or more. When restarting, use the “sandwich method” (moisturizer, then active, then moisturizer) to reduce irritation.
Timeline for Concern
You need to know when to wait and when to call the office.
| Timeframe | What is Normal | Red Flags (Call Doctor) |
|---|---|---|
| 24–72 Hours | Redness, heat, tightness, minor swelling. | Increasing pain, throbbing warmth, spreading redness, yellow/green pus, fever. |
| 1–2 Weeks | Peeling, flaking, emergence of small whiteheads (purging). | Crusting that won’t heal, blisters, cold sores, dark brown patches (burns). |
| 4–6 Weeks | Skin should be clearing. Texture improving. | Persistent cysts, new nodules in clear areas, worsening scarring. |
Frequently Asked Questions about Purging and Post Treatment Breakouts
Is purging a good sign that the treatment is working?
Yes, but with caveats. In the context of turnover-stimulating treatments, purging indicates that the mechanism of action is functioning. The treatment has successfully triggered the skin to shed and renew, pushing out deep-seated debris. Skin purging typically lasts for 4-6 weeks, and once this phase clears, the fresh skin underneath is usually smoother and clearer. However, the absence of a purge does not mean the treatment failed; some people simply have less congestion to clear.
Action plan for patients:
- View the breakout as a “cleaning house” phase rather than a setback.
- Do not try to “fix” the purge with more acne products; let the treatment run its course.
- Focus on the long-term goal: clearer skin usually emerges by week 8-12.
When are antibiotics or steroids necessary?
Most purges resolve on their own without prescription intervention. However, if the inflammation is severe and cystic, it risks scarring. In these cases, a provider might prescribe a short course of oral antibiotics (like doxycycline) to reduce inflammation quickly. Topical steroids are rarely used for acne purging as they can sometimes worsen breakouts, but they may be used briefly for allergic contact dermatitis. Intralesional steroid injections (cortisone shots) can be used for single, deep, painful cysts that refuse to heal, but this must be done carefully to avoid skin atrophy (dents).
Action plan for patients:
- Do not use old antibiotics or steroid creams you have at home.
- Contact your clinic if you develop deep, painful nodules that do not come to a head.
- Ask about a “cortisone shot” only for isolated, large cysts that persist beyond 2 weeks.
Should I postpone my next treatment session if I am still purging?
It depends on the severity. If you have a few small whiteheads, you can usually proceed, and the provider will simply avoid going directly over active lesions (especially with microneedling) to prevent spreading bacteria. However, if you have widespread inflammation, numerous active pustules, or compromised barrier function, it is safer to postpone. Treating over highly inflamed skin can lead to infection or unpredictable penetration of chemical peels.
Action plan for patients:
- Call the clinic 48 hours before your appointment if you have active breakouts.
- Be honest about how your skin feels—if it stings when you wash it, reschedule.
- Expect to wait an extra 2-3 weeks for the skin to calm down before the next round.
What is the practical guidance for follow-up and sending photos?
Don’t suffer in silence if you are worried. Clinics prefer you to reach out rather than guess. If you notice red flags (spreading redness, heat, pus) within 48-72 hours, call immediately. For persistent purging that isn’t improving, contact the clinic around the 4-week mark. When sending photos, clarity is key for a remote assessment.
Action plan for patients:
- Timing: Contact the clinic if things get worse after day 3, or if not better by week 6.
- Photo Prep: Wash your face, stand in front of a window with natural daylight (no flash).
- Angles: Take one photo from the front, and one from each side profile. Keep a neutral expression.
Conclusions and Practical Takeaways for Patients and Providers
We have walked through the science of cell turnover, the specific triggers from microneedling to chemical peels, and the burning questions most patients ask. Now we need to organize this information into a concrete strategy. Knowing the theory is helpful, but having a step-by-step plan reduces the anxiety that naturally comes when you see a new spot on your face after paying for a treatment.
Treatment Risk Hierarchy
Not all procedures carry the same risk. Managing expectations starts with knowing how likely a specific treatment is to trigger a breakout.
| Treatment Type | Purging Probability | Why It Happens |
|---|---|---|
| Microneedling | High (15-30%) | Physical trauma stimulates rapid cell turnover and pushes deep congestion to the surface. |
| Chemical Peels | Moderate to High | Acids like salicylic or glycolic penetrate pores to dissolve oil and force exfoliation. |
| Retinoids (Home Care) | High (20-25%) | Directly accelerates the cell cycle, causing the classic “retinoid uglies” before clearing. |
| Laser Resurfacing | Moderate | Thermal energy can trigger a transient acneiform eruption as the skin regenerates. |
| Radiofrequency (RF) | Low | Heat may cause temporary bumps or folliculitis, but true purging is less common. |
| LED Therapy | None | Light therapy reduces inflammation and does not accelerate turnover enough to cause purging. |
Patient Pre-Treatment Checklist
Preparation is the best defense against severe purging and adverse reactions. Following a strict protocol before you walk into the clinic ensures your skin barrier is strong enough to handle the procedure.
- Stop Active Ingredients Early
Discontinue retinoids, exfoliating acids, and benzoyl peroxide 5 to 7 days before your appointment. This prevents over-sensitizing the skin. - Screen for Infection
Check your face for any active cold sores or infected cysts. If you have an active infection, reschedule. Microneedling over an active lesion can spread bacteria across the entire face. - Hydrate the Barrier
Focus on barrier-repairing moisturizers with ceramides or hyaluronic acid for the week leading up to treatment. Well-hydrated skin heals faster. - Sun Protection
Avoid direct sun exposure for two weeks prior. Sunburned or tanned skin is more reactive and prone to post-inflammatory hyperpigmentation. - Cleanse Correctly
Arrive at your appointment with a clean face, free of makeup or heavy products, to ensure the provider can sanitize the skin effectively.
Aftercare Action Plan: Weeks 1-2
The first two weeks are when the purge typically begins. Your goal during this phase is to support the skin without interfering with the natural shedding process.
- Keep It Simple
Use a gentle, non-foaming cleanser twice a day. Avoid hot water which can strip natural oils and aggravate inflammation. - No Picking or Squeezing
This is non-negotiable. Picking at purging spots increases the risk of scarring and infection. Let the spots resolve on their own. - Hydrate Aggressively
Use a non-comedogenic moisturizer to prevent dryness. If your skin feels tight, you are not moisturizing enough. - Strict Sun Avoidance
Your fresh skin is highly susceptible to UV damage. Use a mineral sunscreen with at least 8% zinc oxide and SPF 30 every single day. - Skip the Actives
Do not rush back to your retinoids or acids. Wait until the skin is no longer tender or peeling, usually around day 5 to 7 for lighter treatments. - Change Your Pillowcase
Sleep on a clean pillowcase every two nights to minimize bacterial transfer to your healing skin.
Decision Flow for Managing Breakouts
Navigating the weeks after treatment requires a logical approach.
Start by assessing the breakout during the first two weeks. If you see small whiteheads or bumps in your usual problem areas, manage this conservatively. Continue with your gentle cleanser and moisturizer, and give it time. This is the expected purge. If the skin feels dry or tight, increase your hydration but do not add acne treatments yet.
If you reach week three or four and the breakout is intensifying but still looks like standard acne, you can modify your routine. Introduce a mild salicylic acid cleanser or a spot treatment once every other day. Watch for irritation. If the skin calms down, maintain this routine until the six-week mark.
However, if at any point you experience increasing pain, heat that radiates from the area, yellow or green fluid, or spreading redness, you must contact your clinic immediately. These are signs of infection. Similarly, if the breakouts are still worsening after six to eight weeks, this is no longer a purge. It is time to consult your provider to adjust your treatment plan or consider a prescription intervention. Skin purging typically lasts for 4-6 weeks, so anything extending beyond this window warrants a professional evaluation.
Moving Forward with Confidence
The journey to clearer, rejuvenated skin often involves a messy middle phase. It is normal to feel frustrated when you see spots appear after investing in your skin. Remind yourself that this is a biological process of clearing out years of congestion. The data shows that for most people, the skin begins to clear significantly by week six, revealing the smoother texture and improved tone you aimed for.
Trust the timeline and stick to the safety protocols. If you are ever in doubt, the safest option is always to reach out to your provider rather than guessing. By understanding the mechanics of the purge, you transform a potentially stressful side effect into a manageable sign of progress. Skin purging is a temporary phase that leads to long-term results, provided you handle it with patience and care.
Sources
- Skin Purging: What It Is and How Long It Lasts – Nolla Health — Skin purging typically lasts 4-6 weeks when starting retinoids or acids. Learn how to tell purging from breakouts and what to expect during treatment.
- Tretinoin Purge Timeline: What to Expect Before Your Skin Clears — Some users may not experience any purge, while others may go through 4–8 weeks of breakouts. Is skin purging a good sign? Yes. It means …
- Skin Purging: What It Is & How to Manage It Successfully — Flares are seen within 1-4 weeks of beginning your skincare routine, and typically last between 2-8 weeks. Once it has passed, positive results …
- Skin Purging: Everything you need to Know – Raggio MD — – Duration: Typically, skin purging lasts for 4-6 weeks. If breakouts persist beyond this timeframe, it may indicate an adverse reaction to the product or …
- Skin Purging: Causes, Signs, and Treatment – WebMD — Skin purging normally lasts a few weeks. It takes about 75 days for your skin to turn over new cells. The timing may depend on other factors …
- Myth Buster: Skin Purging Explained – The Dose — How long does skin purging last? … Purging from active ingredients generally doesn't last for much longer than a month, or six to eight weeks at …
- Characteristics of Patients Seeking and Proceeding with Non … – PMC — This paper aims to identify clinical and demographic characteristics of patients who proceed with non-surgical facial aesthetic procedures in Singapore.
- Skin Purging: What It Is, What It Looks Like, and How Long It Lasts — How Long Does Skin Purging Last? · Week 1-2: Initial Purge · Week 3-4: Peak Purging · Week 5-6: Improvement Begins · Week 8-12: Clearer Skin.
Legal Disclaimers & Brand Notices
The information provided in this article is for informational and educational purposes only and does not constitute professional medical advice, diagnosis, or treatment. Always seek the advice of a qualified physician or other licensed healthcare provider with any questions you may have regarding a medical condition or before undergoing any aesthetic procedure. Never disregard professional medical advice or delay seeking it because of something you have read in this content.
All product names, logos, and brands mentioned in this text are the property of their respective owners. All company, product, and service names used in this article are for identification purposes only. Use of these names, trademarks, and brands does not imply endorsement, affiliation, or certification by the trademark owners.